New Stuff in MDT 2012 – native VHD support
As probably most of you have seen already, the Beta 1 of the upcoming MDT 2012 has been published to connect (Download link) recently (Announcement by Michael Niehaus). Main intent for this update is enabling support for the upcoming ConfigMgr 2012. But the team also included a couple other updates into this release like a “prettier” wizard, Cross-Platform support, etc. However some of the bigger changes “under the hood” did happen on the part that handles all drive and disk related activities like UEFI Support, creating partitions, formatting, etc.
While the Cross-Platform support is really helpful if you need to deploy to different architectures and I’m for sure will have a look on the new wizard, actually my personal highlight in this version is the added support for VHD during deployments. So lets have a look on how that works.
Why VHD?
As you know, a VHD is a file, that acts as a virtual hard drive. So almost anything you can do with a physical hard drive can also be done with a VHD, except that it is still simply a file (or several ![]() ). At the beginning they have been used only for “pure” virtualization purposes in Virtual PC and Hyper-V as virtual hard drives for virtual machines. But Windows 7 and Server 2008 R2 added native VHD support. So both are able to not only create and mount a VHD file as an additional “hard drive”. They also support booting from a VHD. This means, you could now have a computer with a single file on your hard drive and it’s booting from (or into?) this file. After you booted, the content of the VHD is your “C:” drive and the “real” hard drive is “D:”, “E:” or whatever (depends on your settings). Doesn’t that sound funny?
). At the beginning they have been used only for “pure” virtualization purposes in Virtual PC and Hyper-V as virtual hard drives for virtual machines. But Windows 7 and Server 2008 R2 added native VHD support. So both are able to not only create and mount a VHD file as an additional “hard drive”. They also support booting from a VHD. This means, you could now have a computer with a single file on your hard drive and it’s booting from (or into?) this file. After you booted, the content of the VHD is your “C:” drive and the “real” hard drive is “D:”, “E:” or whatever (depends on your settings). Doesn’t that sound funny?
Well, funny is actually enough for me (and a couple others as well ![]() ) to start digging into it it. But there are a couple more benefits why you should have a look on it.
) to start digging into it it. But there are a couple more benefits why you should have a look on it.
First it’s simply a file. Backup is now copying a file. Move your “computer” to a different hardware (yes, you need to take care about drivers) or into a virtual machine and back by a simple file transfer. Have multiple VHDs on the same hard drive, gives you multi-boot without fiddling around with partitions and changing driver letters etc. Or even more funny, create differencing disk(s) based on a parent VHD and boot from these differencing disk(s). Want to test a new Service Pack on your non-virtual computer? Create a differencing disk, boot into this differencing disk. Do some heavy testing. If it is good merge the differencing disk back into the parent VHD. If not, just boot back into the parent VHD and delete the differencing one. Due to this we are now able to move some of the features we appreciate from virtual machines into the world of physical computers.
MDT 2012 – Base support for VHD
Now lets have a look on the support, that the new version of MDT 2012 gives us for this. First, there are two new templates that can be used to create new Task Sequences with added VHD support.
- Deploy to VHD Client Task Sequence
- Deploy to VHD Server Task Sequence
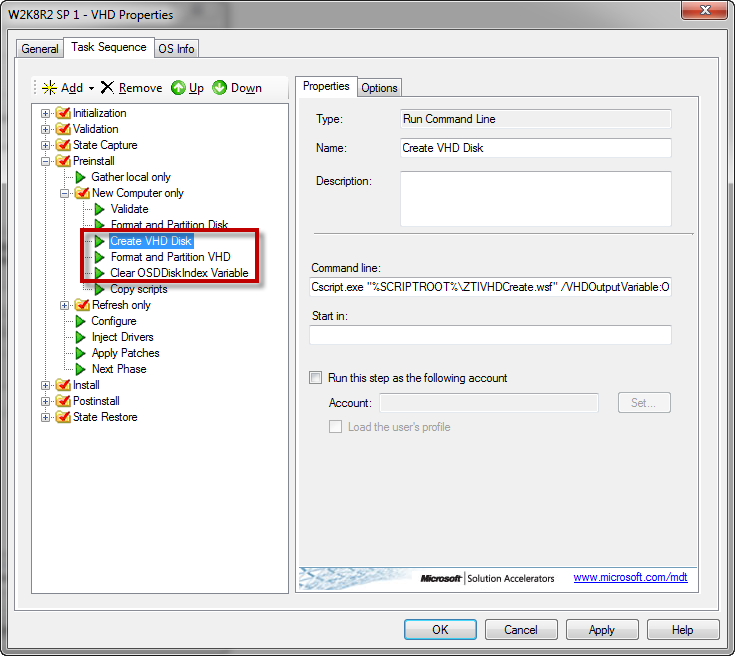
The difference to the standard Client and Server templates is minimal. The new templates just contain three additional steps in the Preinstall phase:
- Create VHD Disk –> Creates a new VHD Disk on the local hard drive and mounts it
- Format and Partition VHD –> Formats and partitions the new mounted VHD Disk
- Clear OSDDiskIndex Variable –> Clears the global variable “OSDDiskIndex” that got set by the “Create VHD Disk” step.
The rest of the Task Sequence is identical to the Standard Task Sequences. So if you would like to use this feature, it’s actually a piece of cake as you just do the same that you did to create your “normal” Task Sequences. And you end up with your Computer booting into Windows 7 / Windows Server 2008 R2 from a VHD. You will find this VHD on the local hard drive in the VHD Subfolder. Named with the TaskSequenceID and some random characters.
A bit more curious on how that works under the hood or how to tweak it? Then read on:
Some MDT 2012 VHD Deep Dive
As we have just seen, it’s pretty easy to get MDT creating and using a VHD instead of the hard drive itself. What is really great already (Big thank you to Michael and Keith ;-)).
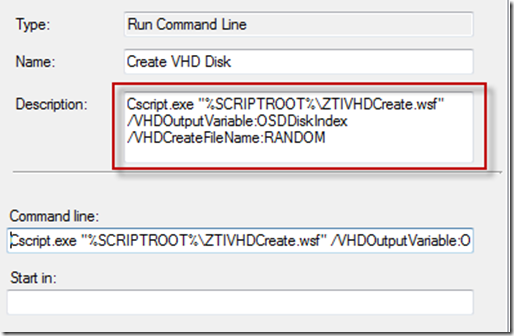
However as with everything in MDT, it works fine and easy out of the box, but can also be tweaked to whatever (well almost) what you want. So let’s have a deeper look into this new functionality. For the beginning, we check how the script is being called in the step that creates the VHD Disk. For easier reading, I just copied the command line to the Description:
We see it’s being called with two parameters:
The first is called VHDOutPutVariable and gets a value of OSDDiskIndex. Using this parameter, we can define into what property the disk index of the VHD file will be stored. And as OSDDiskIndex is used, this is actually the reason why we need to clear that value after the disk has been portioned and formatted (Step 3 for the three new steps).
The second parameter is VHDCreateFileName which is set to RANDOM here. What that does is creating a name starting with the Task SequenceID and some random characters. But we could supply our own name here.
Beside the naming, that doesn’t give us much options. But the script itself offers us some additional parameters as well:
- VHDCreateSource –> Name (and path) of a source VHD Disk. The script will make a copy of the specified source disk and use this copy as the new VHD Disk. Interesting if you have a central repository of prepared VHD disk with syspreped base images. If using a custom source, make sure that you tweak the rest of your Task Sequence accordingly. E.g. the whole content of it would get formatted in the next step
 .
. - VHDCreateDiffVHD –> If a value is set, it will create a Differencing disk based on the new VHD that has just been created and use this differencing disk to continue the installation. You can use RANDOM to create a random file name as for the VHD disk or supply a custom name. This option will come into play if you are using an already prepared VHD as source for your new VHD (e.g. a syspreped base image). Again, it requires some custom changes. Well, actually this option will work with the default task sequence, but it doesn’t really make sense.
- VHDCreateSizeMax –> Specify the maximum size in MB of the VHD file. That might be an interesting parameter, if you want to store something else on the hard drive as well. On default, MDT will size the VHD to 80% of your current free space on the partition it will place the VHD on. Now you need to be aware, that even if the VHD disk type is set to expandable, meaning the VHD disk size will only be as large as the used space within the VHD, it will blow up to the configured size as soon as you boot. So if your VHD has been configured to a size of 100GB, but uses only 15GB of space after everything has been installed, it normally has a size of 15GB as long as the computer hasn’t booted yet into this VHD. If it now boots the VHD, the size of the VHD will increase to 100GB(!) immediately. So if you plan to use several VHDs for Multiboot on the same computer, be sure to configure them for a smaller size. Otherwise you will experience a Bluescreen as soon as the computer boots and there isn’t enough space on the hard drive for the VHD to expand to its configured size. A pretty nasty thing thing if you are starting your experiments with VHDs and don’t take care about it. If the configured max size is actually larger then the mentioned 80% of the free space, it will always use the smallest value.
- VHDCreateType –> sets the type of the VHD disk. Can be either FIXED or EXPANDABLE. Default is EXPANDABLE. Pretty self explaining.
There is another parameter (well actually a MDT property) that will be used by the script which is DestinationLogicalDrive. That property normally holds the partition MDT shall deploy the OS to. It should get discovered automatically but if you want to deploy the VHDs to a different hard drive/partition, you might want to adjust this property.
And finally after the script has been executed, it will write a new property called “VHDDisks” that contains the Partition Index of the new VHDDisk.
Now as we know that MDT treats all parameters as properties, we can define those properties in our Rules (customsettings.ini) as well. But we need to define them as custom properties, as they haven’t been added (yet) as standard MDT properties.
Tip: In case you are interested, see ZTIGather.xml for a list of all standard MDT properties that well be evaluated on default by the Gather step.
Test the script locally
As this script is just creating one (or two) new VHDs and mounts it to the computer, we can even run this script locally to test the behavior. Just two things to notice:
First, you need to run it elevated as it is calling Diskpart.exe internally.
Second, the script will run only if the DeploymentType is “NewComputer”. So we need to pass this properly into the script call.
Now to run this script we could call the following from an elevated command prompt:
|
1 |
cscript.exe ZTIVHDCreate.wsf /DeploymentType:NEWCOMPUTER /VHDOutPutVariable:OSDDiskIndex /VHDCreateFileName:RANDOM /Debug:True |
Now looking at the ZTIVHDCreate.log from C:MININTSMSOSDOSDLOGS we see how it parsed the properties, prepared the name, path and size and after some more details that I skipped in the screenshot, that everything went well:
And we will see the new VHD created in the VHD folder
and mounted to our Computer:
Now as we know how to call it, we can test more fancy stuff like using a differencing disk and giving it proper names
|
1 |
cscript.exe ZTIVHDCreate.wsf /DeploymentType:NEWCOMPUTER /VHDOutPutVariable:OSDDiskIndex /VHDCreateFileName:MyParent.vhd /VHDCreateDiffVHD:MyDiffDisk.vhd /Debug:True |
etc.
So lets download the new MDT 2012 Beta 1 and start some testing. ![]()
Be aware that this information is based on the current Beta 1 so that might change until the final release. But I will update this post if anything changes, so be sure to get back to it.


Recent Comments