Automatically remove computers from a collection and reset the last PXE advertisement flag after a Deployment has finished
Two of the administrative tasks you often have to do after a SCCM based Deployment has finished is removing the computer from the OSD Collection it has been added to start the Deployment (you don’t really want to leave a computer in a collection with an active OSD advertisement, do you?), and to clear the last PXE Advertisement flag in cases the Deployment has been started via PXE.
The latter is mainly interesting for testing purposes, where you need to re-image the same computers over and over again. But it’s also helpful in cases where the initial Deployment failed. If the underlying problem has now been fixed the Tech (or End-user) might not be able to re-initiate the Deployment before you also cleared the last PXE advertisement flag of that computer. I understand that this has been created to avoid kind of a Deployment loop for computers configured to boot from network first. But as we also remove the computer from the collection there shouldn’t be any bad side-effect. And there is still the caching on the PSP.
Since Version 7.0 the Deployment Webservice (Download) supports a couple methods that let us remove a computer from a specific collection and also to clear the last PXE advertisement flag. So all we actually need to know is the current collection. The following is based on an idea from Richard Zuraff and Jason Scheffelmaer (give credit where credit is due 😉 ). They suggested to simply add the same custom variable to each OSD Collection and then just add the CollectionID to this variable. If the TS executes, this variable will be available for us and filled with the ID of the appropriate collection. This way we can use a generic approach to remove the computer from whatever collection is configured in this variable. Very easy to implement and support.
PreReqs
The following example assumes that you are using OSD with MDT integration. If you don’t use MDT at the moment you really should consider doing it now. It takes only a couple minutes to be done and doesn’t interfere with anything you have configured already. It is even possible to extend current OSD Task Sequences with the scripts used by MDT to take advantage of the Deployment Webservice for some initial testing to see the advantages of MDT yourself. And for sure you need to have the Deployment web service running (Installation Guide).
Creating the Collection variable
So let’s start.
We first create a new Collection Variable. For sake of simplicity I call it “CurrentOSDCollectionID”.
If you choose a different name you would just need to update the part in the cs.ini supplied later on.
Update the customsettings.ini
To be able to make a webservice call we need to tell MDT how it can call it. This webservice definition is typically stored in the customsettings.ini.
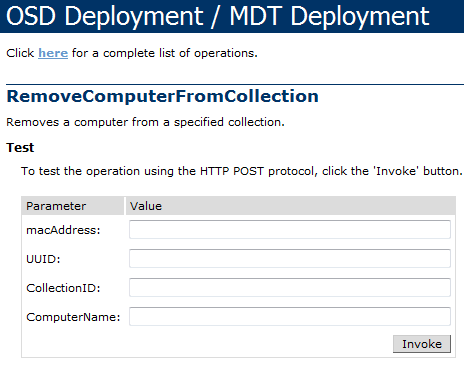
OK, let’s have a look on the SCCM part of the Deployment web service. You can open this with your browser by pointing to http://YourWebServer/YourDirectory/sccm.asmx (replace the values accordingly). You will now see a list of all methods currently supported by the Deployment Web service in regards to SCCM (see mdt.asmx for MDT related and ad.asmx for Active Directory related methods). The method we are looking on first is called “RemoveComputerFromCollection”. If you click on the method itself, you will see the definition of this web service method and a way to easily test it:
It tells us, that we need to supply 4 parameters for this method. While we need to configure all four of them in the definition not all parameters need to have a value. Supplying either Mac Address or UUID is e.g. enough to identify the computer. But for sure we need to supply the CollectionID.
So the definition we need to add to the customsettings.ini looks like
|
1 2 3 4 5 |
[RemoveComputerFromCollection WebService=http://YourWebServer/YourDirectory/sccm.asmx/RemoveComputerFromCollection Parameters=macAddress,UUID,CurrentOSDCollectionID,OSDComputerName CurrentOSDCollectionID=CollectionID OSDComputerName=ComputerName |
As you can see, the method would like to have a parameter called CollectionID. But our variable we would like to use is called CurrentOSDCollectionID. So in the definition we tell MDT to use CurrentOSDCollectionID as value for the original parameter CollectionID. It might look a bit strange the first time, but the concept is quite simple so I’m pretty sure you will grab this at once ;-). MacAddress and UUID come from the Gather step so no need to take any action.
Tip: If you added the computer dynamically using a custom boot wizard as described in this post be sure to use the Deployment Webservice with Version >= 7.2 (Download / Release History). If using an older version you need to make sure that you use the same “computername” you used as you added it to the collection as it will be used as the Rule name. If this initial “computername” differs from the final computername, maybe due to generating the computername later by the gather step, it might be necessary to store this initial/temporary computername during the Deployment and re-use it for this particular web service call. This is necessary only in versions before 7.2 that made use of the Rule name. So be sure to be up-to-date with the version (as always it’s just a copy&Replace upgrade)
The definition to clear the last PXE advertisement is even simpler:
|
1 2 3 4 |
[ClearLastPXEAdvertisementForComputer] WebService=http://YourWebServer/YourDirectory/sccm.asmx/ClearLastPXEAdvertisementForComputer Parameters=macAddress,UUID,AssignedSite AssignedSite=SiteCode |
Just be aware that this method requires the current SiteCode to be able to “talk” to the right primary. In this example it’s called the “AssignedSite” as it actually is the site code of the assigned site. There is another webservice method that will be able to get this sitecode for you. Here is the rest of the cs.ini showing this part (It’s actually the first part of the cs.ini. See the complete one in the download). If you have only one primary, just hardcode the AssignedSite and remove the appropriate call from the Priority line:
|
1 2 3 4 5 6 7 8 9 10 11 12 |
[Settings] Priority=Initialize,GetSCCMAssignedSite,Default Properties=AssignedSite [Initialize] [Default] AssignedSite=XXX [GetSCCMAssignedSite] WebService=http://YourWebServer/YourDirectory/AD.asmx/GetSCCMAssignedSite AssignedSite=string |
The siteCode is required by most SCCM related web service methods so it’s a quite common method. In this case I’m using Active Directory to get this information so it requires that you have integrated SCCM into AD. It’s also possible to query the SCCM SLP for this but this requires a small script as the required values would need some changes before they work so I will skip this in this example as AD integration is a quite typical scenario.
Executing the web service methods
OK, we have updated our cs.ini with all the necessary information to be able to contact the web service. And after the Gather step has run the first time (which happens more or less immediately after the Task Sequence has started) we also have all necessary information like SiteCode and CurrentOSDCollectionID etc.
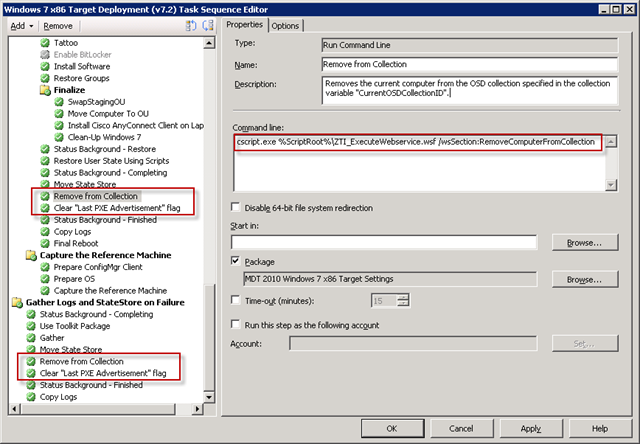
So when would be a good time to execute those methods? I would say as one of the last steps. And best would be if they get called no matter if the Task Sequence succeeded or failed. It’s probably a good idea to remove the computer from the collection in any case. MDT 2010 (and MDT 2010 Update 1) come with a bunch of updated SCCM templates that use some kind of giant Try..Catch block to encapsulate the Deployment steps and enables the possibility to execute a couple of clean-up steps in case something fails.
Because of this we would need to add our web service calls two times. One time at the end of the “normal” Task Sequence and the second time in this “catch” block. In both cases I would do it somewhere before the final “Copy Logs” step so that we have the output from those calls still in the logs. For MDT 2008 it’s a bit easier as you have to add those steps just once. But same recommendation about placing the steps apply. Just make sure that you use the correct version of the script.
The only thing left is the actual call of the web service method. If you read already some post on this blog you most likely have seen a couple example script that were used to execute some individual web service calls. But mostly it was an individual script per web service method (if not called directly by the Gather step).
In the last post I showed a new script I just published using a more generic approach. It can be used to call (almost) any web service method that returns none or a single value. All you need to supply is the name of the section with the web service definition. There are a couple other parameters you can use if necessary see this post for further reference.
So to remove the computer from the current collection we just need to add the script to our MDT scripts package and execute the following command
|
1 |
cscript.exe %ScriptRoot%ZTI_ExecuteWebservice.wsf /wsSection:RemoveComputerFromCollection |
and to clear the last PXE Advertisement flag accordingly
|
1 |
cscript.exe %ScriptRoot%ZTI_ExecuteWebservice.wsf /wsSection:ClearLastPXEAdvertisementForComputer |
So your Task Sequence could now look like
Find all the files used in this example on Codeplex at this location. Also be sure to check out the other projects on MDT Customizations and also the MDT Web FrontEnd.
As always, the scripts and supporting files are provided AS IS. So be sure to test them thoroughly before putting in production.
Also any feedback is appreciated. If you find any issues with this, just get back to me.


Recent Comments