Handling lists in MDT web service calls – Adding Computers / Users to Active Directory groups
A common question if it comes to deployments is, how to add a computer (or user) to one or several Active Directory groups. As you probably know, I generally prefer using web services for any Active Directory related task, as this avoids a lot of typical issues like permission problems, adding ADSI to the WinPE etc. Luckily the Deployment Web Service, which is freely available on CodePlex, has some appropriate functions that allow us to fulfill this task.
Adding a computer (or user) to a single group is pretty easy and can be done with a simple/single web service call. But how about adding the computer to a list of groups? Especially if we don’t know the amount of groups in advance? Which leads to the more generic question, how can I execute a web service function, if I have a bunch of similar values to supply and I actually would need to call the web service once per value? Do I need a huge amount of more or less redundant/equal steps in my Task Sequence?
Adding a computer / user to one AD group
Let’s start with the easy task and add the computer to one AD group only. It’s pretty straight forward and pretty similar to other web service calls, that I’ve demonstrated already on this blog. What we need is a custom property that stores our AD Group and the definition on how to call the web service. So these are the necessary entries in the customsettings.ini to make this work
|
1 2 3 4 5 6 7 8 9 10 11 12 13 14 |
[Settings] Priority=Init,Default Properties=ADGroup [Init] ADGroup=MySecureADGroup [Default] [AddComputerToADGroup] WebService=http://YourWebServer/YourWebDirectory/AD.asmx/AddComputerToGroup Parameters=ADGroup,OSDComputerName ADGroup=Groupname OSDComputerName=Computername |
As you can see, we create a custom property called “ADGroup”. During the gather step, this will be filled with the value “MySecureADGroup” (while it’s processing the Init section). The section “AddComputerToADGroup” contains the definition on how to call the web service. We don’t add it to the “Priority” line, as we don’t want to execute this web service function during the gather step, as the computer account most likely doesn’t exists at that step.
So what we need is a script, that reads this definition and executes the web service function. As you (hopefully) know, I’ve supplied a generic script for this purpose, that can be executed from a “Run Command Line” step in the task sequence. It’s called “ZTI_ExecuteWebservice.wsf” and also available on CodePlex. Please see this Blog Post, for a more detailed description on what it can do.
After we dropped this script in our MDT Scripts folder (or the Scripts folder in our ConfigMgr MDT Package) and updated the customsettings.ini, all we need is to add another “Run Command Line” step to our Task Sequence. I would recommend to add this pretty late in the Task Sequence. At least after we have joined the domain ![]()
The command line should execute the following command:
|
1 |
cscript.exe "%ScriptRoot%\ZTI_ExecuteWebservice.wsf" /wsSection:AddComputerToADGroup |

We just call the script and tell it in which section it finds the necessary information. That’s actually all you need to add the computer to the specified AD Group. And as with all properties in MDT, you can get this information either static or based on some dynamic rules, even from a database or another web service.
Adding a computer / user to multiple AD groups
Now, as that was pretty simple, let’s tackle the problem on how to add it to multiple groups. MDT allows you to define List properties, that can be filled with values. Some built-in examples would be “Applications”, “Packages” or “Role”. Now you can also define one of those List properties as a parameter for the web service call. A pretty common scenario for this is the MacAddress property which can also store several values and is pretty often used in Web service and Database calls. On default, MDT uses only the first value of the list. So if we create a custom list that stores our AD Groups, we would only be able to add it to the first one.
That means, we need to find a way to iterate through a list and execute the web service for each single entry. To solve this problem, I’ve updated the mentioned script (so be sure to download the most recent version, if you used it already). It now has an additional argument, that can be supplied either directly via command line or via customsettings.ini. It’s called “wsProcessLists”. If it’s not set at all or set to “False” or “No”, everything will behave like before. Only the first value would be used. If you set it to “True” or “Yes”, it will iterate over the list (if there is any) and execute the configured web service function for each entry.
So assume the following customsettings.ini
|
1 2 3 4 5 6 7 8 9 10 11 12 13 14 15 16 |
[Settings] Priority=Init,Default Properties=ADGroup(*) [Init] ADGroup001=MySecureADGroup1 ADGroup002=MySecureADGroup2 ADGroup003=MySecureADGroup3 [Default] [AddComputerToADGroup] WebService=http://YourWebServer/YourWebDirectory/AD.asmx/AddComputerToGroup Parameters=ADGroup,OSDComputerName ADGroup=Groupname OSDComputerName=Computername |
Only slightly different to the one I showed before. The property is now a list property ( defined by this (*) ) and we add a couple more values to it. Nothing else has changed. Now all we need to change in the command line is adding the mentioned argument:
|
1 |
cscript.exe "%ScriptRoot%\ZTI_ExecuteWebservice.wsf" /wsSection:AddComputerToADGroup /wsProcessLists:True |
If we now execute the task sequence, the new computer account will be a member of all configured AD groups. We can use the same functionality to add it to several ConfigMgr collections, etc. Each web service call will be logged, and the script will also write some additional information for better troubleshooting if you enable the debugging in MDT.
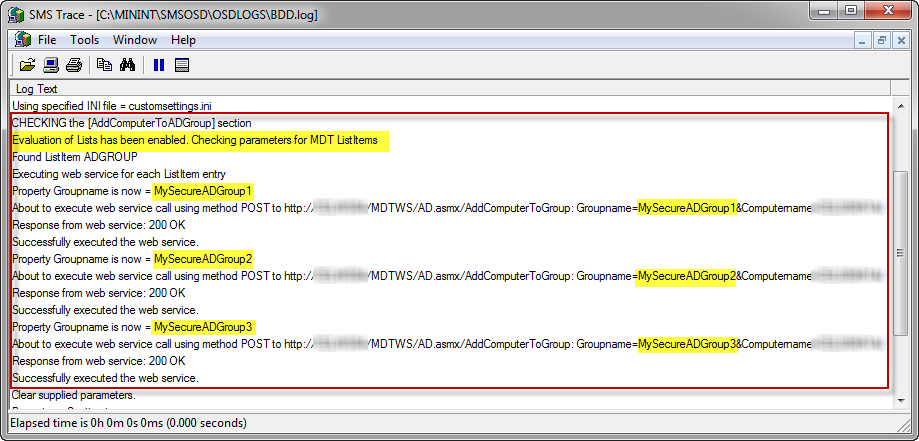
Here two screenshots from the BDD.log (I enabled debugging, so we can see a bit more). It’s using the customsettings.ini just shown. In the first screenshot, it’s using the default MDT behavior. As you can see, only one call is executed and the computer is only added to the first group we have added to the list:

Now in the second screenshot, we have called the script with “/wsProcessLists:True”, and we see that the web service is called three times:
That should be simple enough, shouldn’t it?
However, there are two small limitations on that functionality
- It’s processing only the first list property it finds in the list of parameters. So if you have several of them, be sure to order them appropriately in the web service definition.
- The list must have a different name, than the corresponding web service parameter. The script is mapping each value directly to this parameter, which doesn’t work, if they have the same name.
Also, if you would like to process the results, be aware that these are independent calls, so only the value from the last execution would be stored (or from the first run, if you told the script to not overwrite any existing values).
Happy testing and as always, this script and information is provided AS IS. Be sure to test it thoroughly and whatever happens, it will be your fault alone ![]() .
.
If you found this script helpful, please get back to CodePlex and give it a proper rating. If you found an issue with it or would like to have some more functionality implemented, just start a discussion. I’m happy about any feedback.

Is there an updated link for these scripts? CodePlex is no longer an active website, it is in archive mode now. I can’t seem to find “ZTI_ExecuteWebservice.wsf”